So, there I was, looking around for a static site generator.
Please note:
I have subsequently (as of 2019-12) migrated to pelican.
Mynt was/is good, but lacked the wider support that someone as slow as me needed.
Bountiful themes were/are lacking, small numbers of users resulting in documentation being maintained seemingly only by the author, plus that whole shiny new thing.
This post retained for completeness.
We've all observed that the first post on almost everyone's blog is a 'why I chose this SSG' ... so this means I can keep this here, and not have to repeat it with a discussion around Pelican.
There's an insane number of these things now – very many of them written in languages that I (for very sound reasons) do not wish to trouble myself, or indeed my computer, with.
I found Mynt - it's flexible, lightweight, extensible, and helps with two of my Life Goals (the first - to start learning Python, and the second - to avoid learning Ruby).
Setup and Configuration
This has been covered in any number of places already – it's pretty straightforward, so I shan't dwell on it much.
I'm running KDE on top of Debian GNU/Linux, from which we can conclude one of two things. Either:
- you're running the same setup, in which case it would be redundant to explain this to someone of your obvious sophistication, or
- you're not, in which case it would merely be pointless.
Having said that, here's a precis:
shpongle:~#  apt-get install python-pip rubygems
shpongle:~#  pip install mynt
shpongle:~#  gem install compass sass
shpongle:~#  exit
shpongle:~$  mkdir -p private/mynt/jeddi.org
shpongle:~$  mynt init -f  private/mynt/jeddi.org
shpongle:~$  cd  private/mynt/jeddi.org
shpongle:~/private/mynt/jeddi.org$  git init .
shpongle:~/private/mynt/jeddi.org$  git add .
shpongle:~/private/mynt/jeddi.org$  git commit -am "Initial commit"
Yes, okay, there's some Ruby crept in there, but that's the (regrettably high) price you pay for living in 2012 apparently.
I also configured git to be mastered back on my gitolite server so I can maintain an off-site backup – gitolite usage is well covered by Sitaramc's most excellent documentation.
Customising the layout
Obviously this is a big part of the joy of mynt, or indeed any of these site generators, and so far I've done a minimal amount of customising, most of which you can easily inspect, natch.
One thing I wanted early on was a graphic behind the banner – they're all the rage, don't you know? – so I made this quite trivial change to the file _templates/layout.html:
<div id="header" style="background:url('{{ '{{' }} get_asset('images/20120410-019-026_tm_mantiuk.jpg') }}')">
I've used one of the built-in extensions (I don't think it's part of native Jinja) called get_asset() – so that I can build (gen) the site locally for testing, and comparably easy for pushing up to the production site per se. If I had a range of banners that I wanted to cycle through, then a generic background.jpg would be indicated, and just change the symlink periodically.
The Workflow
To work with Mynt – and the same is true of almost every static site generator out there – you need to know a smattering of Markdown. This is a well trodden path, and there's plenty of good documentation on the Markdown site.
Initially with Mynt I was a bit bewildered by the lack of documentation for things like Best Practice in terms of where you put your files, how you lay things out, and so on – but after an hour or so yakking in the #mynt IRC channel on Freenode with Anomareh, I think I've got a pretty good workflow.
As an aside, Andrew (the author of Mynt) is a tremendously helpful chap – well, as helpful as almost all free software developers I've ever talked to. Which is to say, tremendously helpful.
First, I've chosen to use SASS, which is not obligatory with Mynt, but does make for a simpler life. Mynt ships with its SASS source files, so it's easy to start with them.
This means that for stylesheets I will modify ./_assets/css/_sass/_base.sass rather than the .css files directly (located under ./_assets/css/). If I wanted to just hit the css files intead, then that's fine too, and I could ignore the _sass stuff entirely.
In order to make the most of the SASS stuff, I need to set up the Compass (SASS) watcher. This means it's a good time to introduce the idea of watchers, as I'll be mentioning the other one in a few paragraphs. A watcher does precisely what it sounds like it does – it watches a directory (and its subdirectories) for any new files, or changes to existing files, and when it spots any such activity, it .. does something. In our case it generates a new set of output files.
So, I open up a tiny terminal window and navigate here, to run this:
shpongle:~/private/mynt/jeddi.org/_assets/css/_sass$ compass watch
The Compass Watcher looks for any changes to the .sass file(s), and will generate a .css file as output in the directory above it.
The Mynt Watcher does much the same thing for all the other files, including (happily enough) the css files that the Compass/SASS watcher generates, which in turn triggers the Mynt Watcher to rebuild the whole site. Of course, the Mynt Watcher will also notice any changes you make to markdown files, adding new images, and so on.
The Mynt Watcher is launched thus:
shpongle:~/private/mynt/jeddi.org$ mynt watch -f ~/public_html/b
For me, with a local apache server running, this means I can have a browser window pointing to that location, and (because I've got an auto-refresh script running on my Konqueror browser) I then see any changes within a few seconds.
This is a convenient way of developing a new page – it's highly iterative, of course, so you get constant feedback – but to be candid it can be a smidge distracting to the process of actually thinking and then coming up with stuff to write.
A picture is worth 902 words, so here's what it looks like:
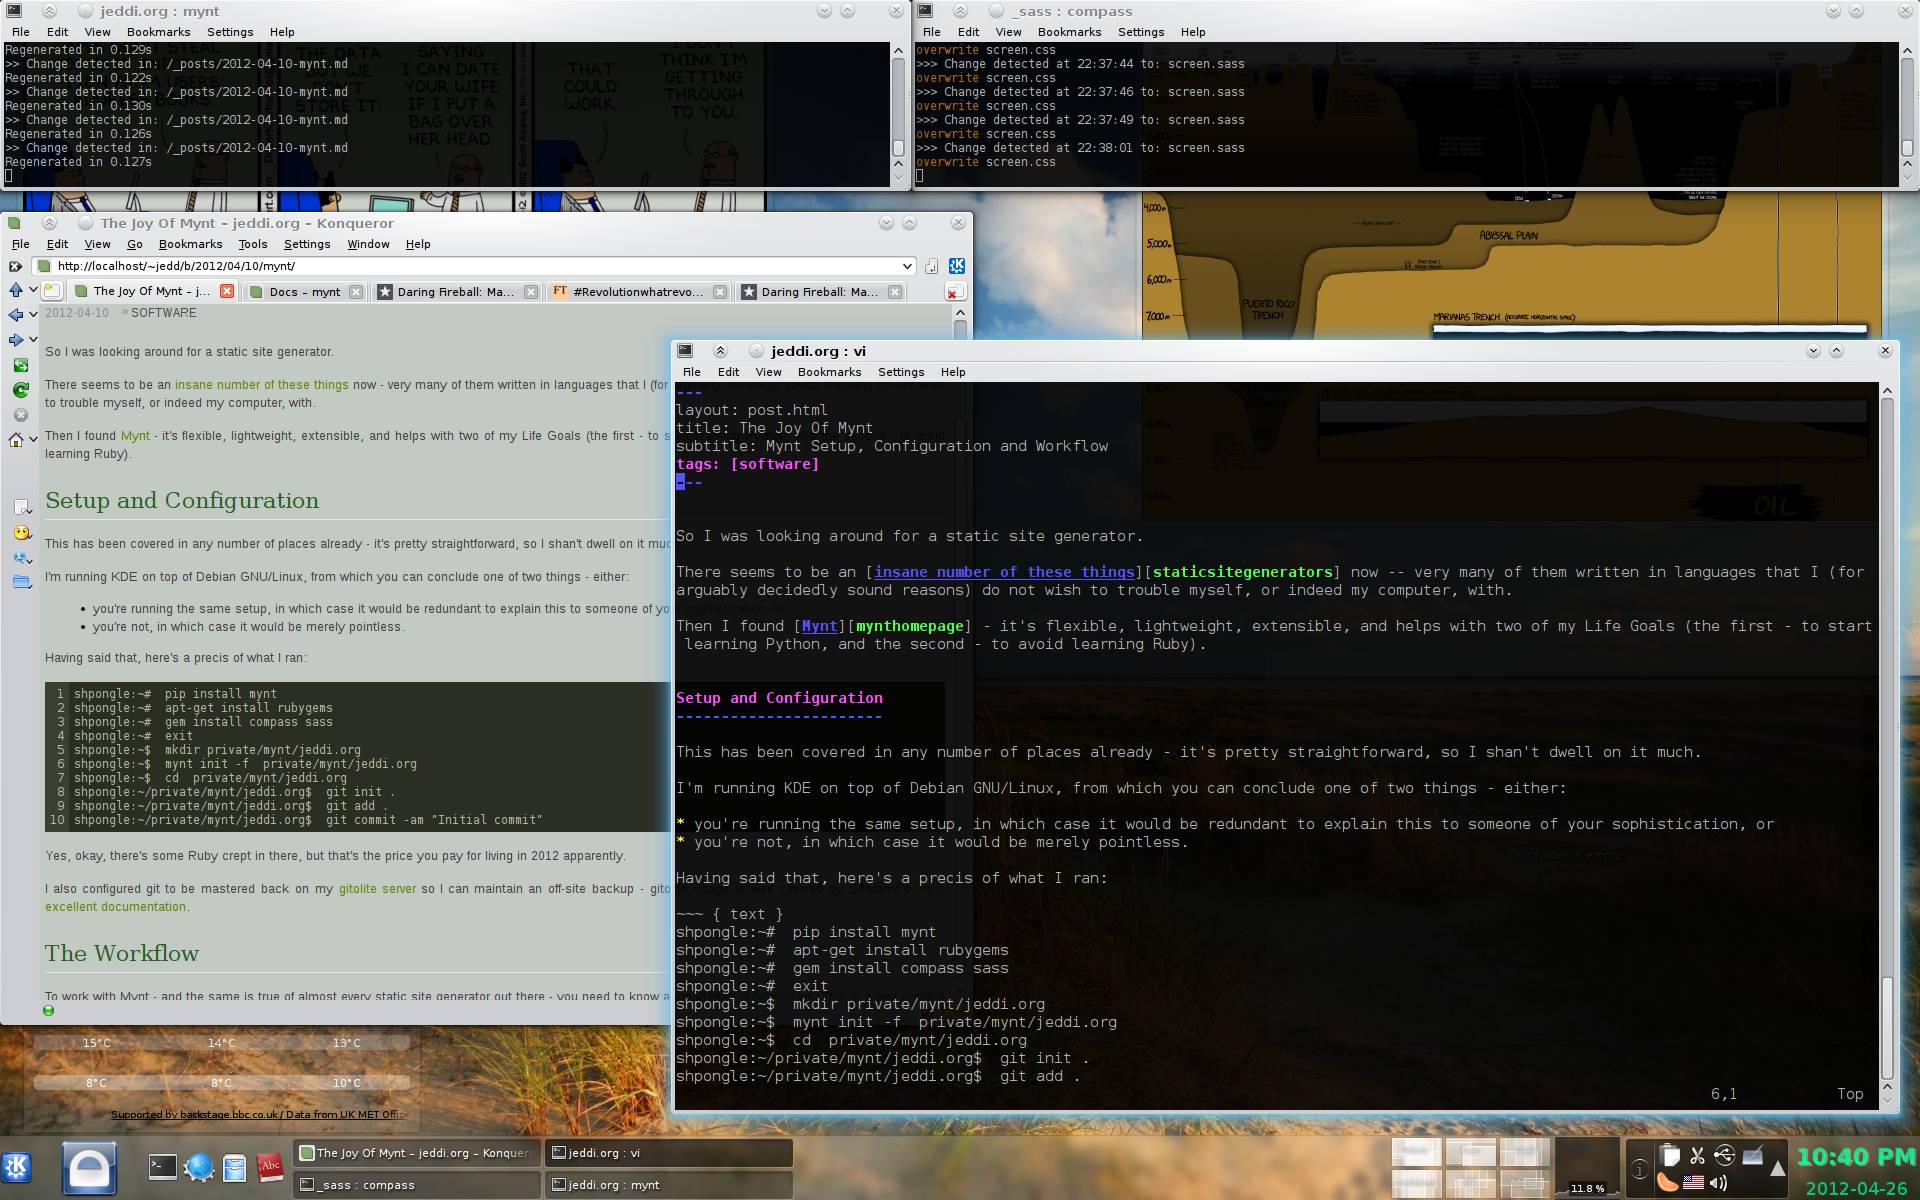
You can use jinja2 codes for images. To stay tidy, it's good to wrap them in Markdown reference links rather than inline. The above screen cap and thumb were stored in _assets/images, and then pulled in with:
[![Screenshot of workflow][img-mynt-thumb]][img-mynt-full]

[img-mynt-thumb]: {{ '{{' }} get_asset('images/2012-04-10-mynt-thumb.jpg') }}
[img-mynt-full]:  {{ '{{' }} get_asset('images/2012-04-10-mynt.jpg') }}
I used to keep all such reference links at the bottom of the file, treating them as a type of footnotes as far as the Markdown was concerned – but my thinking has evolved on this, and I now like to keep the references immediately under the paragraph or section they were used in. To be clear – the above code sample shows the actual calling-in of the image (the first line) and the other two lines are the way of generating the img-mynt-thumb and img-mynt-full reference ID's.
And that's probably plenty to get you started.
My experiences so far have been positive – there's definitely a learning curve, but the system seems well thought out, and there's plenty of scope to extend it to do some pretty funky things in the future, when I need to.
For further reading, check out what sameksake has done with his mynt with fabric setup – I'll likely do something similar, but firing directly out of my gitolite server I suspect.