With the recent release of the Raspberry Pi 2 (1GB RAM, 4 cores -- up from 512MB RAM, 1 core) I've been motivated to replace a bunch of basic standalone RPi security cameras with something a bit more sophisticated.
Note that this project (and page) is very much a Work In Progress (WIP).
At the moment I'm using a very basic system, with no facility to auto-propagate captured security images. I'm not, in fact, convinced this is the best approach. A hierarchy of devices, with the ones with remote access also being the most physically secure, has appeal. However, at the very least, I need to design a system that will allow new devices to be added to the network relatively painlessly.
Also note that in my particular case I'm designing for an environment where I do not have always-on Internet access, so the usual approach of just uploading all images to a VPS isn't feasible. I may have intermittent network access, but it'll likely be via 3G, so a) expensive, b) slow. This is why I need a mesh network, in order to provide some resilience in the event one of the units is identified and stolen. I need to be able to subsequently (some days later, perhaps) retrieve the photos taken by that unit right up until it was removed.
Dealing with devices that are removed from the network is quite straightforward -- how to react to devices that are seemingly removed, but subsequently reintroduced to the network, is a far more interesting (read difficult) question.
So, on this page I'll cover the following items:
- base-build of the RPi image, using Raspbian
- discussion of using:
- bmaptools to replicate SD images quickly
- SaltStack to then install and maintain Debian packages
- setup and configuration of the motion package
- security approaches for the network, including:
- how to replicate captured images on one node to a quorum or all other nodes (WIP)
- preventing intrusion by an agent using a compromised node (WIP)
Hardware, Network, and OS configuration
Hardware configuration
Each node is constructed from the following components:
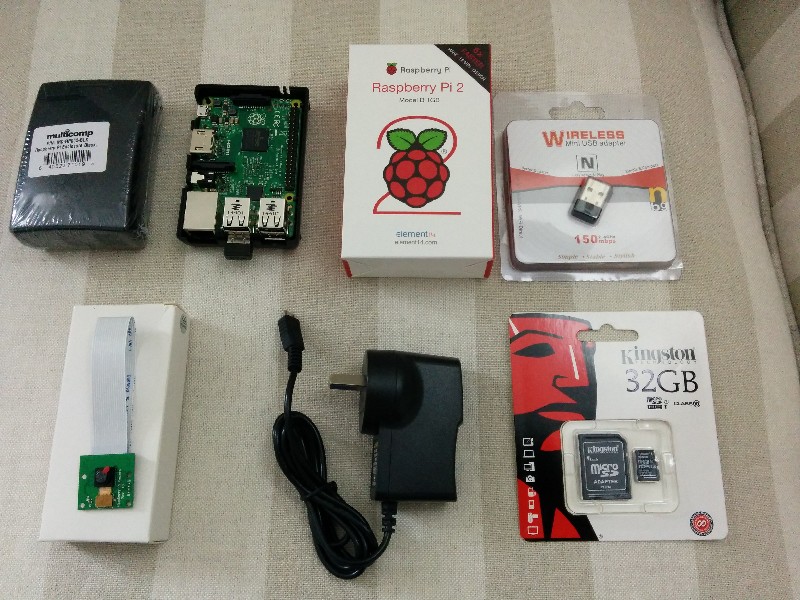 Hardware for RPi camera node
Above I've shown the cheap-n-cheerful components I'm using (top to bottom, left to right):
- Black RPi 2 case (Little Bird Electronics (AU), A$12)
- Raspberry Pi 2 mounted in case (bottom half only)
- Raspberry Pi 2 (Little Bird Electronics (AU), A$57)
- Ralink / MediaTek 802.11 Wireless USB dongle (ebay, A$5)
- Raspberry Pi Camera module (ebay, A$22)
- 5V 2A wall wart PSU (ebay, generic, A$8)
- Kingston 3GB microSD (staticice, A$18)
What would I do differently on a subsequent design / purchase?
Biggest impact is cost, of course. When you're building upwards of ten such nodes, as opposed to just making a single media centre for home, you're literally looking at an order of magnitude greater outlay. Fiddling around with software in order to save a few dollars on a single unit almost starts to be a worthwhile tradeoff, on the other hand.
Anyway, I'd almost definitely not spend A$11 per case -- there are some much cheaper varieties out there, but more importantly I'd probably construct custom cases, if I needed a case at all, as (without revealing too much) I've tried to use interesting objects to insert these devices, along with some high-capacity batteries. Fitting the camera into / onto something that's transparent and waterproof was another challenge, of course, and wasn't made any easier by the presence of the case.
Likely I would also avoid the Ralink wifi dongles, too, as they're a pain to get going. Happily I'm not going to be upgrading my software frequently once these appliances are in place, so it's less of an issue (now I've sorted the driver problem out).
32GB cards may be excessive, depending on what approach I end up using for sharing images around (see rambly discussion regarding security further down this page). However, there's not much savings to be had by going with a smaller capacity card, so it's a small concern.
Network configuration
These devices will talk back to a single 802.11 AP, using WPA-PSK2 of course.
I looked briefly at using one (or more) of them as AP's, as there's some lovely code out there that'll dynamically flip a RPi from wireless client to AP, depending on the availability of other AP('s), however this was a bit more complicated than I need, and also brought me back to ponderings regarding security).
PSK2 is, of course, a no-brainer. I'm using a residential grade AP, with hidden SSID, as almost all of my attacks are likely to come from non-sophisticated intruders, so obscurity has significant benefits.
While there are aspects to the network that are undeniably mesh / peer to peer, there's an expectation of one or two highly secure appliances. Secure in the physical sense (no camera attached, hard to find, hard to get to), and the logical (they do pull operations to the camera nodes -- nothing can pull from them).
Basic Raspberry Pi configuration
On first boot you get a couple of options that you can set. It's worth doing this properly, at this point, prior to imaging and replicating the various settings.
Crank up 'raspi-config' (you get it on first boot, but if you ignored it then, return to it now)
My settings of choice:
* Expand File System -- this blows out the rootfs to the full size of the microSD card
* Internationalisation options -- I change Locale, Timezone and Keyboard layout
* Enable Camera, natch
* Advanced options:
  * Memory Split -- these run headless, so the smallest memory for GPU possible
  * SSH -- enabled, natch
The File System Expand requires a reboot, so do that now.
Getting the Ralink mt7601 USB WiFi module working
This can take some effort, especially if you're using contemporary (for whatever that means for you, right now) kernels on the RPi.
Note that at the time I built these I was using the standard Raspbian distro -- there's not sufficient packages of a native Debian distro to flip away from Raspbian just yet.
Plus I'm using:
Linux raspberrypi 3.18.9-v7+ ... armv7l GNU/Linux
Which meant I needed to hunt down the package:
mt7601-3.18.9-v7-768.tar.gz
I discovered lots of places where people talk about their challenges getting the mt7601 kernel module compiled / installed / actually running. There are myriad challenges here, including the problem of using a Raspberry Pi Model 2 -- if you use the modules for the earlier model you get 'invalid format' errors for the kernel object (.ko) files.
Anyway, there's a fantastic thread at http://www.raspberrypi.org/forums/viewtopic.php?f=28&t=49864&p=723103 where some tremendously helpful people supply new versions of this module as new kernel / firmware releases get distributed. There's also some good walk-throughs in that thread on how to extract and test the drivers for this USB dongle.
This is the end-state that you're looking to obtain:
root@raspberrypi:~# lsmod
Module                  Size  Used by
mt7601Usta            583791  1
...
There's a couple of ways you can do WPA password configuration -- either directly in /etc/network/interfaces, or via the wpa_supplicant configuration. I prefer the latter (it's more modular, and lets me manage things with SaltStack a bit more elegantly).
If you use wpa_supplicant (it's installed in Raspbian by default) you just need to edit two files.
Your /etc/network/interfaces file:
auto lo

iface lo inet loopback
iface eth0 inet dhcp

allow-hotplug wlan0
iface wlan0 inet dhcp
  pre-up wpa_supplicant -Dwext -i wlan0 -c /etc/wpa_supplicant/wpa_supplicant.conf -B -P /var/run/wpa_supplicant.wlan0.pid
  post-down killall -q wpa_supplicant
and /etc/wpa_supplicant/wpa_supplicant file:
ctrl_interface=DIR=/var/run/wpa_supplicant GROUP=netdev
update_config=1

network={
key_mgmt=NONE
}

network={
ssid="YourSSID"
scan_ssid=1
proto=RSN
key_mgmt=WPA-PSK
pairwise=CCMP TKIP
group=CCMP TKIP
psk="YOURSECRETPASSWORD123"
}
You can have multiple network stanzas, so you can test at home, for example, then deploy to a different location with some confidence the appliance will come up on the new wifi network.
Once I'd got the wlan0 interface working (with DHCP), I did an:
apt-get update
apt-get upgrade
... and then ...
apt-get -d install salt-minion
I didn't create the custom ID for the appliance yet -- I'll do that once they've got their own, clean slate, microSD image burned.
Everything else I'm going to do with these units is done via Salt, so I don't have much else to customise on them prior to duplicating the image.
Creating the disk image
Once you've got an image that you're happy to use as a base image, the next step is to generate a device dump of this gold image SD card.
Shutdown the RPi, remove the microSD card, pop it into your card reader, and then (assuming you're on a real operating system) you'll create a sparse image with dd.
We'll use the sparse parameter of dd, which ensures zeroed out areas are kept as empty, making the subsequent writes much faster (again a much bigger issue when you're making a dozen or more of these things).
To save you some time I'll demonstrate the differences, just in case you don't want to trust me outright.
Consider these two commands:
dd if=/dev/sdg bs=4M of=image-raspberry2-nonsparse.img
and
dd if=/dev/sdg bs=4M conv=sparse of=image-raspberry2-sparse.img
Both those commands take ~30 minutes to perform, using a USB2 port, and a generic micro-SD to SD adapter in an SD to USB2 dongle.
You can't really optimise this task (perhaps using a faster microSD card, or a USB3 adapter, though at least one of those is as rare as rocking horse shit). Anyway, point is that in general this time isn't negotiable as it requires a full read sweep through the entire card.
However, the two resultant files are an interesting difference (interesting if you've never delved into sparse files)
Reported disk usage is the same, as you'd expect:
shpongle:~/foo# ls -l
-rw-r--r-- 1 root root 30G Mar 20 18:16 image-raspberry2-nonsparse.img
-rw-r--r-- 1 root root 30G Mar 20 17:45 image-raspberry2-sparse.img
However, actual disk usage was massively different, of course:
shpongle:~/foo#  du -ah
30G    image-raspberry2-nonsparse.img
3.6G   image-raspberry2-sparse.img
Now, bmap-tools is a nifty facility to generate a bitmap of what blocks are actually in a disk image, so that when you write it out (using bmap-tool) you only write the blocks that have data on them. This is much faster, as you'd exect, given we're now writing 3.6GB, rather than 30GB.
In case you're curious, I'll show here the generation of a bmap file from both the sparse dd and the normal dd:
shpongle:~/foo#  time bmaptool create image-raspberry2-sparse.img  --output image-raspberry2-sparse.bmap
real    0m16.385s
Compared to:
shpongle:~/foo#  time bmaptool create image-raspberry2-nonsparse.img  --output image-raspberry2-nonsparse.bmap
bmaptool: WARNING: all 29.0 GiB are mapped, no holes in 'image-raspberry2-nonsparse.img'
bmaptool: WARNING: was the image handled incorrectly and holes were expanded?
real    3m37.408s
Plus, as you can see, bmaptool alerts you to the fact that you're working with a non-sparse image.
Anyway, this is all going to get very exciting when you start writing out these images to many new, blank, microSD cards:
Traditional dd approach (note that your SD card is almost definitely not sdx)
shpongle:~/foo#  time dd if=image-raspberry2-nonsparse.img of=/dev/sdx bs=4M
7431+0 records in
7431+0 records out
31167873024 bytes (31 GB) copied, 3505.59 s, 8.9 MB/s
real    58m25.595s
Crikey!
But using bmaptools (note that it auto-discovers the presence of the file image-raspberry2-sparse.bmap)
shpongle:~/foo#  bmaptool copy image-raspberry2-sparse.img /dev/sdg
bmaptool: info: discovered bmap file 'image-raspberry2-sparse.bmap'
bmaptool: info: block map format version 2.0
bmaptool: info: 7609344 blocks of size 4096 (29.0 GiB), mapped 943104 blocks (3.6 GiB or 12.4%)
bmaptool: info: copying image 'image-raspberry2-sparse.img' to block device '/dev/sdg' using bmap file 'image-raspberry2-sparse.bmap'
bmaptool: info: 100% copied
bmaptool: info: synchronizing '/dev/sdg'
bmaptool: info: copying time: 6m 53.6s, copying speed 8.9 MiB/sec
Writing 3GB of data inside a 30GB image takes 7 minutes using bmap tools, or 59 minutes using conventional dd.
Now you know. : )
Excogitations upon the matter of security
My use case is likely different to yours, primarily because I don't have always-on network access from any of these appliances.