A work-in-progress description of setting up Debian GNU/Linux on a new Dell Precision M3800 (functionally an equivalent model to the Dell XPS 15).
The first half of this page describes the physical installation of a second hard drive into the laptop, because Dell charge an exorbitant amount for factory-installed secondary drives, and because I didn't want factory-installed Windows 7 to have already consumed anything on the second drive. As it happens the 256GB shipped disk had 70GB unused on it, which saves a bit of grief.
The second half of this page describes the fun of installing and configuring Debian GNU/Linux on this second drive, maintaining a dual-boot option, and a shared-partition.
Overview
There's a fair few blogs out there talking about setting up various GNU/Linux distributions on both Windows 7 and Windows 8(.1) Dell XPS 15 and Precision M3800 (effectively the same machine, but for the video card, and a few other subtleties). However it's rare that everyone has the same experience, and even rarer that they occur at the same time, so you'll typically have to dig around a bit to find someone with the same goals as you, and who used the same software versions that you're trying to use.
For instance I note that Ana Nelson had a totally different problem, back in 2014-03, of just getting networking up and going. Networking really wasn't a challenge in my case, but I was happy to install via the supplied USB-Ethernet adapter, and the firmware blobs required are in the current (frozen) testing branch -- jessie.
Joachim had roughly similar problems, and somewhat more recently, but was using Ubuntu and Unity, so he/she had n+2 problems.
Anyhoo ...
As is often the case, a big part of writing this up is to provide assistance to our future self.
And there's rarely a 100% alignment with your setup and problems to someone else's setup and problems.
With that in mind, and in case you landed here looking for an answer to a particular problem, here's my configuration:
My equipment
- Dell M3800, purchased with:
- 16GB RAM (maximum allowable)
- 256GB solid state mSATA drive
- display: 38cm / 15" with 3200 x 1800 WQXGA+ (Wide Quad Extended Graphics Array Plus)
- GPU: NVIDIA® Quadro® K1100M with 2GB GDDR5
- Microsoft Windows 7 Professional (factory installed)
- Hardware addition:
- 1TB Samsung EVO SSD
- Dell official bracket, screws, and SSD adapter kit (not cheap)
End-state goal
My ideal use case will involve never (or at least rarely) booting into native Windows, but I need to use Microsoft Office applications heavily for work, so I've purchased another copy of Windows 7 Professional to run inside a VM under Debian. The expectation is that there will be a separate, shared, raw (native) partition that can be accessed by both the factory installed version of Windows as well as my VM (and, of course, Debian using FUSE NTFS). I have an Office 365 subscription so I can install native Word / Excel / etc cruft in both environments.
I suffer another work constraint of needing to run virtual machines that will only run under VMware, and have yet to determine the best way forward on that one, since I want to run these under Debian primarily, and have had lots of challenges in the past getting VMware (workstation) drivers to play nice with GNU/Linux distros, especially when running kernels less than 3 years old. I speculate that I may end up running ESXi within another virtualisation environment, perhaps KVM. As mobile roaming network prices get cheaper here in AU, I may be happy enough using exclusively VNC/RDP into my ESXi server at home.
On the laptop itself, everything (or more accurately as much as possible) will reside on encrypted partitions -- obviously this refers to the Debian GNU/Linux side of things moreso than the native Windows side.
Status (last updated 2015-02-01)
These things are working:
- Dual-boot - Windows 7 and Debian GNU/Linux (jessie) using GRUB
- Debian GNU/Linux:
- Working:
- USB3 / RJ45 adapter (GbE)
- Touchscreen - emulates mouse only (no pinch-to-zoom, scrolling, etc)
- Bluetooth mouse (though usually requires a reconnect via KDE bluedevil)
- X / KDE (though the expected confusion some apps have with High DPI display)
These things are not configured / tested / fully working (yet):
- Shared NTFS volume for native and virtualised MS Windows environments
- Debian GNU/Linux:
- audio
- camera
- Intel Wireless (kernel module: iwlwifi) seems to have intermittent flakiness
- sensible / automatic switching between nVidia and Intel GPU chipsets (ie. bumblebee / optimus)
Hardware Installation
1TB mSATA SSD drive
I spec'd out the laptop explicitly keeping this second drive bay empty. It fits a 7mm 2.5" (yeah, I hate mixing and matching metric with imperial, but everyone calls laptop drives as 2.5", and bizarre they've settled on these two 'standard' thicknesses for them - 7mm or 9.5mm).
Anyhoo.
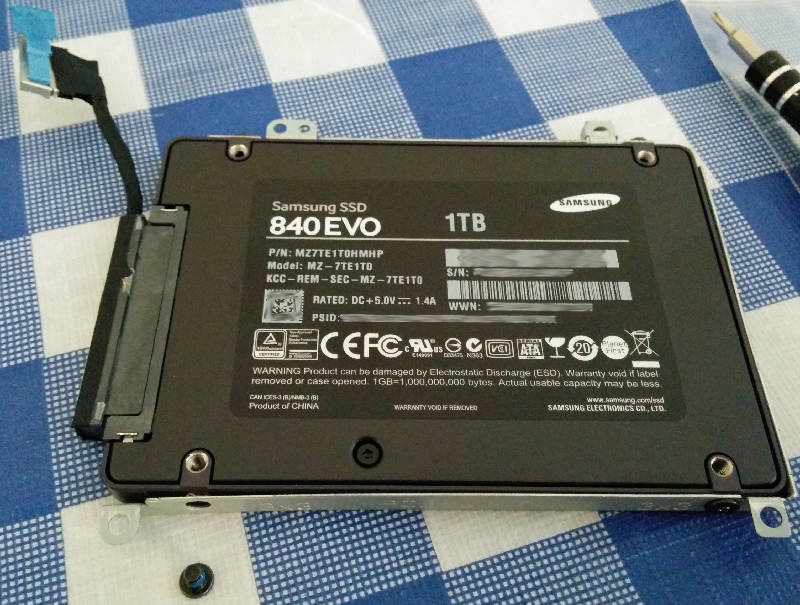
I ended up buying a Samsung MZ-7TE1T0BW 840 EVO Series 1TB SSD, mostly because I need the capacity, partly because it wasn't that much higher a premium over the 512GB models, partly because it's tricky (and/or hideously expensive) to find anything with a larger capacity, and partly because I don't want to revisit this activity again any time soon.
A bit of research on the Net revealed that no one else seems to sell after-market caddies that fit the Dell M3800. Also that the required mounting screws are constrained by the small amount of space available within the case, so given it's a work machine, I just sucked it up and ordered the whole lot from Dell in Australia. In retrospect I should not have bothered with the screws -- but we went through four email cycles with the sales person, who originally and bizarrely assumed I'd want one screw of each type.
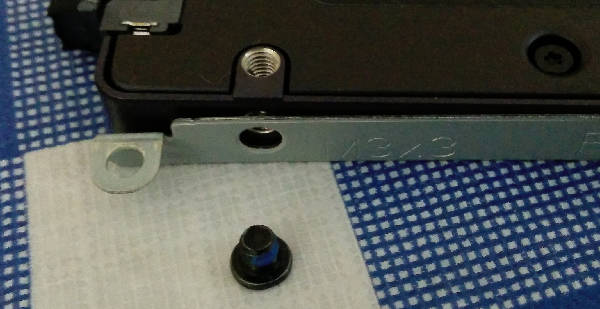
 Dell parts list
Parts list (textified) for those exasperated Dell customers that can't find this on the Dell site.
Bracket proper: CPA-21YWY // ASSY,BRKT,HDD,9530 // Tag No.: 139VN12
SATA Adapter (ribbon): CPA-DG95V // ASSY,CON,HDD INTRPSR,9530 // Tag No.: 139VN12
Screws: CPA-2864D // SCR,M3X3,KSH,MS,BLO // Tag No.: 139VN12
Other screws: CPA-63PDH // SCR,M2.5X5,PHH,TF,BCS // Tag No.: 139VN12
Note the screw part number refers to a single screw. There's no kit per se that includes the caddy, the adapter, and the screws to hold the drive into place. Yes, that's more than a bit ordinary. Also, I didn't track which screw type was used to attach the drive to the mounting bracket versus attaching the mounting bracket to the chassis. Soz.
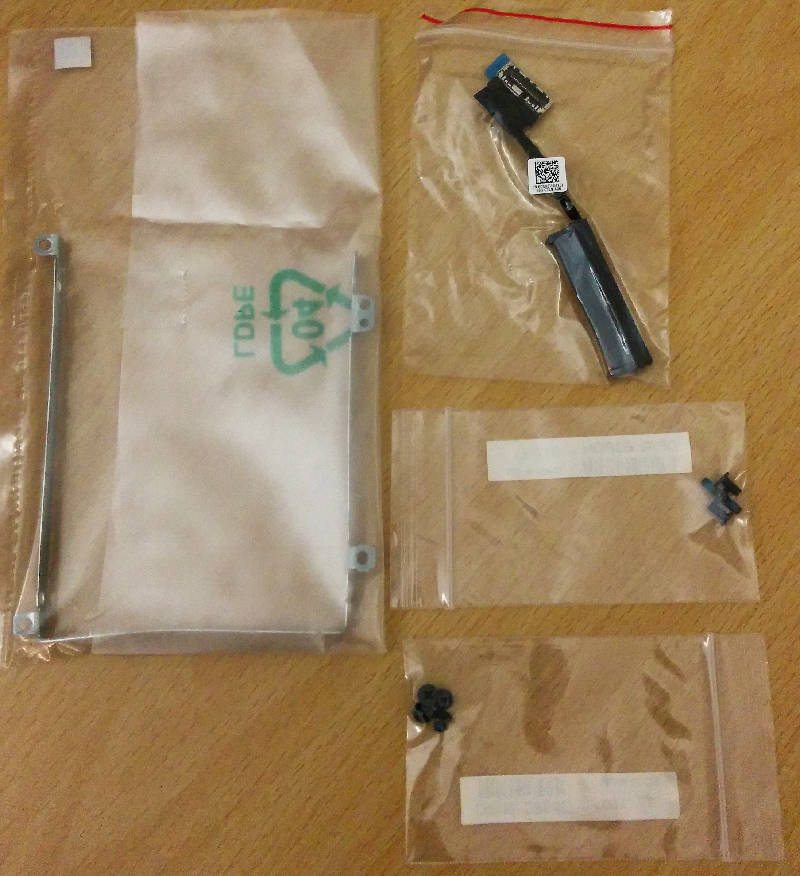
In the photos below you can see the type of screw for attaching the drive to the caddy - there's a bit more space than you think with these, but flat-head screws to fit hard disks are common enough. The screws that go into the plastic of the chassis were fairly vanilla too, I think, but I didn't take much notice of the details, and it felt like they were self-threading, though it may just have been the non-slip gunk that they shipped with.
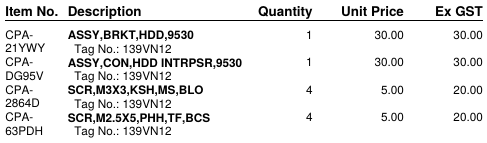
 Dell open and ready
In the background are padded bags (x2) containing the two screw sets, and the boxes containing the ribbon adapter, and the metal caddy.
I've circled in red the location the ribbon adapter plugs into. And in orange where the disk gets mounted -- upside down (because the case is upside down, natch).
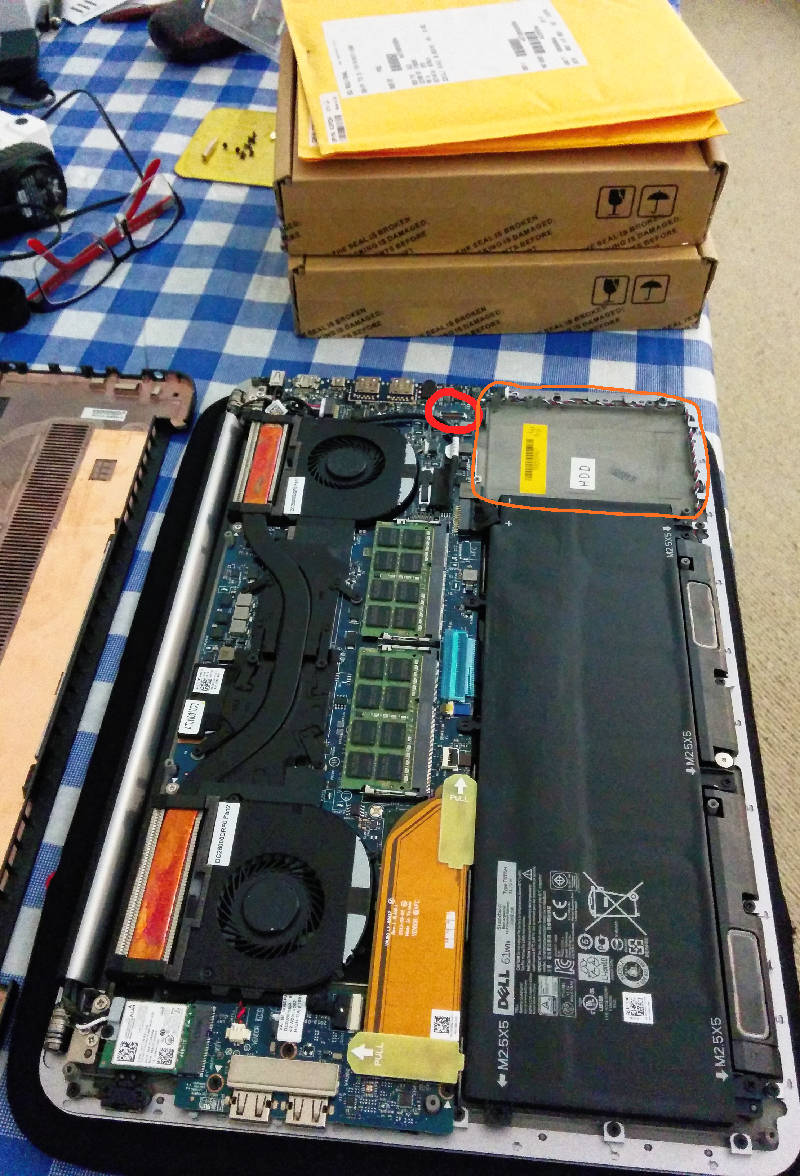
The Adapter, Caddy, and two Screw packets, once de-boxed, are shown here. I know it's a tired old joke to laugh at the way these things are packaged, but it remains ridiculous, nonetheless.
 Dell components - caddy, ribbon adapter, screws
Here we see the drive being attached to the caddy. Just hold the caddy over the chassis so you can line up the holes to reassure yourself. Note that the holes are asymmetrically arranged, so it can only go one way around, and that the 'wings' that you'll be screwing down into the chassis have to be at the top when looking at the machine opened in this way. Really, you'll be fine, and I'm sure there are a few dozen youtube videos that describe this in lurid detail.
 Dell caddy - close-up
 Dell caddy - with disk
Mounting the caddy into the bay is straightforward, though I did find the heads on these small philips screws were pretty soft. I don't expect I'll have to take them out again, happily.
Note that in the next two photos I haven't actually got those caddy --> chassis screws in place yet.
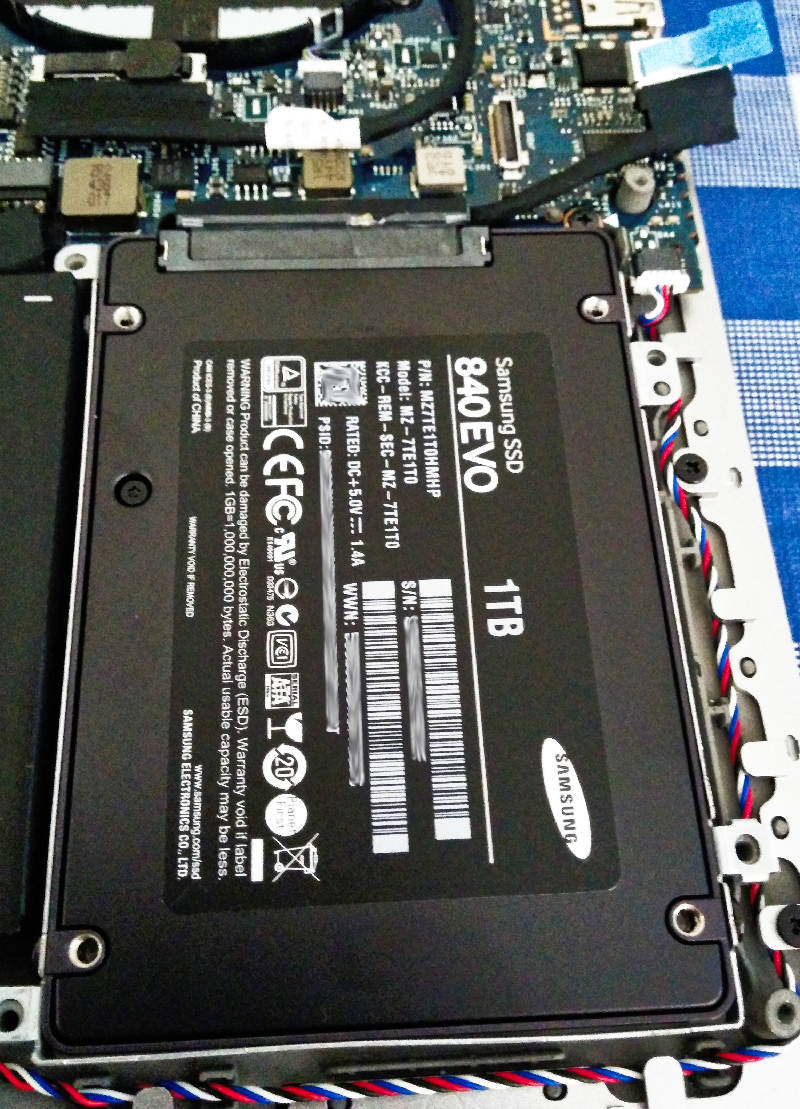 Dell 2.5 inch disk mounted in place
 Dell ribbon adapter attached to motherboard
And that's about it as far as the physical installation goes.
Getting the lid back on with this thing is much easier than getting it off.
On boot I hopped into the BIOS and confirmed the new drive was visible. In Windows 7 it gives a pop-up asking if you'd like to cruft up your shiny new drive with the second worst file system in modern history, to which, of course, you thump the No key as fast as possible.
Once I was happy the drive was mounted sensibly, I moved on to risking everything with a new OS installation . . .
Software - Debian GNU/Linux jessie
 initrd woes at boot time
Partition layout
Note that after installing the second drive, the factory-installed drive presents as /dev/sdb.
The following partition is what you get when you buy a 256GB model with Windows 7
shpongle:~#  fdisk -l /dev/sdb

  Disk /dev/sdb: 238.5 GiB, 256060514304 bytes, 500118192 sectors
  Disklabel type: dos

  Device     Boot    Start       End   Sectors   Size Id Type
  /dev/sdb1             63     80324     80262  39.2M de Dell Utility
  /dev/sdb2  *       81920  24743935  24662016  11.8G  7 HPFS/NTFS/exFAT
  /dev/sdb3       24743936 356755455 332011520 158.3G  7 HPFS/NTFS/exFAT
Reinstalling Windows 7 from scratch (possible if you were thoughtful enough to demand installation media at the time of purchase, which as it happens I was) might recover some of the space, especially that /dev/sdb2 partition, which is presumably a rescue volume of some sort -- but with an additional 1000GB now in the box, and the knowledge it'd take a good day to do a full reinstall of Windows, it wasn't a compelling proposition.
Similarly, it's feasible to reduce the size of the /dev/sdb3 volume, but with a combination of FUSE NTFS, and Samba, I expect that I can re-present any data on this C: drive into both Debian, and whatever Windows VM I build to run inside Debian, and, again, risk & time cost versus benefit just wasn't persuasive.
Anyway, the really lovely thing here is that Dell's imaging process only sucks up 170GB for Windows, which leaves about 70GB unused, and, even more happily, that can be used as a primary partition if I wanted to.
I did contemplate using that space as the root file system ( / ) on Debian, but that felt a wee bit messy as I'd prefer the entire Debian installation lived on a single physical disk. I also anticipated that I was more likely to just allocate /dev/sdb4 for the shared volume for the native and virtualised Windows instances, as it feels like enough space for that purpose. (I need to share a couple of large documentation repositories, some VMware .OVA files, etc, and they hover around 30-50GB.)
The new 1TB drive presents as /dev/sda
For various reasons I like as much of my system encrypted as possible.
Generally this means I set up partitions like this:
- /boot - something under 1GB - unencrypted
- / (root fs) - usually around 50GB
- LVM Physical Volume for 'the rest of the disk'.
shpongle:~# fdisk -l /dev/sda

  Disk /dev/sda: 931.5 GiB, 1000204886016 bytes, 1953525168 sectors
  Disklabel type: dos

  Device     Boot    Start        End    Sectors  Size Id Type
  /dev/sda1  *        2048    1953791    1951744  953M 83 Linux
  /dev/sda2        1953792   99610623   97656832 46.6G 83 Linux
  /dev/sda3       99610624 1953523711 1853913088  884G 83 Linux
Partition layout arguments tend to be even more fun than vi .v. emacs, but loosely my decision is informed via vague paranoia, substantial grief in the past trying to resolve problems where / (root fs) mounts to a Logical Volume on top of a cryptsetup drive, an expectation that 50GB or so will be plenty, but not excessive, for a basic installation of the normal suite of software I end up installing on a KDE machine.
Anyway, and somewhat obviously, if you don't want to encrypt your partitions, then this whole section is moot.
If you do want to, and haven't before, then be aware the Debian text-based installer will happily do this, with a couple of gotchas ... for instance, do NOT say 'yes' to zeroing out the entire volume -- you'll wait for a week for it to complete, and don't try to configure up your large 'catch-all' volume (sda3 above) during install -- instead install to /boot and / only.
And say NO to a swap partition.
Once you're up and running it's straightforward to then convert that last partition to LVM and start slicing it up as you need to.
If you end up needing swap, obtain it via swapfiles -- it's easier to adjust the size of your swap if you use a series of 1GB /swapfile.x files (say), than if you have a fixed size swap partition. Alternatively you can configure swap as a logical volume, of course, on your big crypted partition.
Base Debian installation
I used a DVD image (ISO) of wheezy debian-7.3.0-amd64-netinst.iso -- it works okay, as this release has sufficient support for USB to Ethernet devices.
Mind, I also had to get a copy of the debian-live-7.8.0-amd64-rescue.iso image, to solve a later problem (see below -- regarding a broken initrd ramfs image).
Anyway, booting from an external USB-DVD drive was painless, by accessing the Boot Order option (F12) at power on. It's worth noting that I had Legacy (non-UEFI) configured on the device when I received it -- I assume this is a feature that accompanies the Windows 7 factory-install option, and it doubtless made life much easier. Dealing with changing from UEFI to Legacy mode has given me plenty of challenges in the past.
Base Debian installation is pretty straightforward, so there's not much to say about it here.
Partitioning, if you're doing encrypted file system, can be a bit Fun, but the gotchas mentioned above cover this (reminder of the big one -- disable the 'zero the partition' option for encrypted file systems before finalising that section, otherwise you're in for a very long wait).
Towards the end of the installation process you get the option to install several groups of packages. I installed the following sets:
- ssh server
- laptop
- system utils
I installed GRUB to the mbr (or gpt equiv) of /dev/sda (the new drive). This seemed to work nicely enough, after I changed the BIOS Boot order to be boot from this hard disk first. It means if the drive ever fails, I can get back to the identical configuration I had previously, where Windows boots from the original 256GB mSATA card.
And GRUB picked up automatically that /dev/sdb1 was an item worth retaining in the GRUB menu -- a lovely feature that's worked reliably for several years now.
Once the base instance is installed, it'll force a reboot. If the reboot works (gets you back to a console login prompt) then most of the difficult stuff is done.
Doing the apt-get dist-upgrade from wheezy to jessie
Right now, jessie is in frozen state, and pretty well advanced along that process, so it's a good place to be. This will be my work machine, so I'm less inclined to run sid on it, at least until I'm more familiar with the quirks of hardware in the box, and also the features of systemd.
Updating to jessie is pretty painless, however. A change to /etc/apt/sources.list of all occurrences of wheezy jessie, an apt-get update, then an apt-get dist-upgrade -u, and away you go.
As noted, it brings in systemd, and as below I got stung on this process. Watch the screen carefully -- I'm not sure what triggered the problem, but I think that it should be easy to rectify any initramfs rebuild in response to errors during the apt-get process.
Default SSH root user security has changed, at last, to be without-password, but apart from that not much delta from a base wheezy install, at least in a configuration sense.
At the time I did the upgrade there was only one package that was held back -- db5.1-util -- which was happy to be updated explicitly, and just wanted to ditch libdb5.1 and python2.6 -- no great losses, obviously).
Pay attention to all errors ...
I didn't. Big mistake.
During the first apt-get dist-upgrade (wheezy to jessie) I noted some complaint about the initrd image not compiling sensibly, but had kicked off a reboot before contemplating just how bad this could be.
And How bad could it be?
Quite bad.
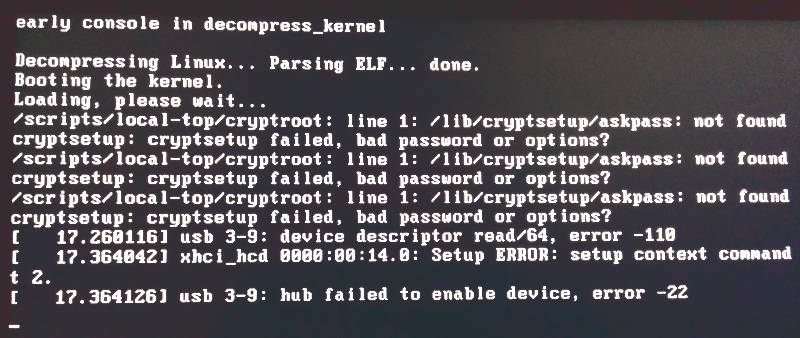
Once more, for the desperate hunters of solutions to their problems:
  /scripts/local-top/cryptroot: line 1: /lib/cryptsetup/askpass: not found
  cryptsetup: cryptsetup failed, bad password or options?
It highlights how fragile a combination crypted root file systems, jessie's frozen status, and the challenges that early adopters of systemd can face. As it happened I had experienced some Fun with systemd on a test Debian VM a while ago, when evaluating precisely this kind of configuration (boot partition --> encrypted rootfs), but back then (late 2013) I hit an entirely different set of problems. At the time we were some way off from a distribution-level commitment to systemd.
Anyway, this was a total pain, and it happened just after the first upgrade, but before any real configuration had occurred, so I was half tempted to just start the installation process again from scratch. As it happened, it would have taken roughly the same time to resolve.
I needed to crank up a LiveCD, mount the /boot (/dev/sda1) file system, unpack the initramfs-3.16.0-4.0 to a temporary directory, add files to it, recreate the file, put it back into /boot, then reboot the box from the hard drive ... and it took several iterations to get all the requisite files.
A shortcut (which I thought of after the second iteration) is to use ldd to show library dependencies of cryptsetup.
In any case, if by some chance you're here looking for a solution to this particular problem, and you can't be arsed (or you're too committed to your build) to start from scratch, you need these files:
    sbin/cryptsetup (missing)
    lib/cryptsetup (directory, missing) - four files including askpass)
    lib/cryptsetup* (files, missing) - copied from install (hdd) at ./lib/x86_64-linux-gnu/libcrypt*
    lib/libpopt*
    lib/libgcrypt*
    lib/libgpg*
    lib/libuuid.so.*
    lib/libselinux.so.1
    lib/libpthread*
    lib/libpcre*
    lib/librt*
    lib/libdl*
    /lib/modules/3.16.0-4-amd64/kernel/crypto/*
    /lib/modules/3.16.0-4-amd64/kernel/arch/x86/crypto
    /lib/modules/3.16.0-4-amd64/kernel/drivers/crypt
    /lib/modules/3.16.0-4-amd64/kernel/drivers/md/*
And, in case you've forgotten how to pull apart cpio archives, the process is thus.
Mount your actual (hard disk) /boot partition.
Copy the initramfs-x.yy.z-a.b to a temporary directory. Go there.
  mv initramfs-x.yy.z-a.b  initramfs-x.yy.z-a.b.gz
  gunzip initramfs-x.yy.z-a.b.gz
  mkdir foo
  cd foo
  cpio -id < ../initramfs-x.yy.z-a.b
Copy the files shown above into the directory structure, matching the above structure.
Recreate the cpio archive with:
  find . | cpio --create --format='newc' > ../newinitrd
  cd ..
  gzip newinitrd
Do a quick visual check of the file sizes. You are expecting this newinitrd.gz file to be a bit bigger than the original initramfs-x.yy.z-a.b file that was on your /boot volume.
If it is, then copy this file over the top of the one on your /boot volume.
mv newinitrd.gz /mnt/boot/initramfs-x.yy.z-a.b
If you're paranoid, you can first replicate the current initramfs on your /boot to the same directory, with a different name, but in reality not much benefit, as the whole point is that the initramfs archive is broken and unusable anyway.
Then reboot back through GRUB on the hard disk, and you should be good to go, even if you get dropped into initrd CLI interface, and perhaps have to insmod kernel modules and cryptsetup luksOpen the root file system, etc.
Running update-initramfs either side of this problem will probably prevent it / solve it for you.
Aside -- I found a suggestion on Ubuntu launchpad to create the file: /usr/share/initramfs-tools/conf-hooks.d/forcecryptsetup and put this in it:
export CRYPTSETUP=y
I did this, re-ran update-initramfs again, but can't confirm if it was required at this point. As I say, systemd with crypt drives is an area full of surprises, especially on Debian jessie. The particular bug was documented as likely to be fixed properly by 'the end of 2014'.
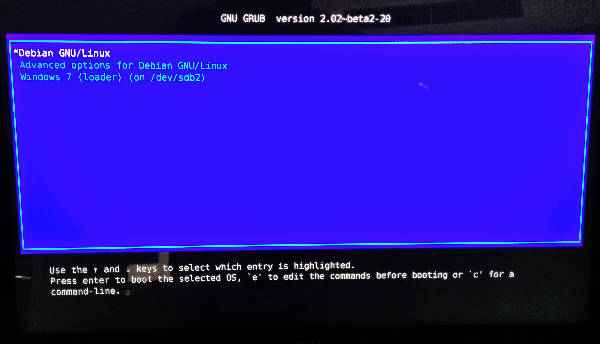
First High DPI challenge - GRUB has teeny-tiny fonts
On the first boot, you'll get a slow screen draw (a problem I haven't fixed yet), and then the familiar GRUB menu, however it'll use a particularly small font:
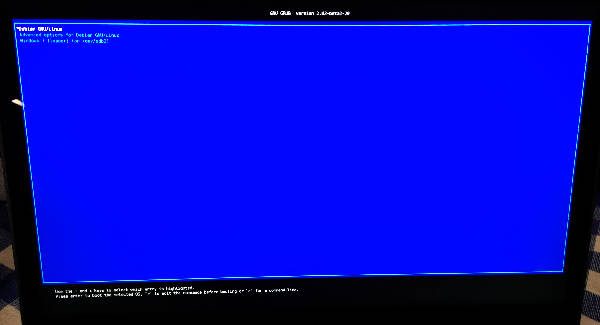 GRUB with small fonts - before being fixed
The way to fix this is not especially straightforward, unfortunately:
- Pick a font you like the look of for grub -- Deja Vu Sans Mono seems to be popular
- Create a PF2 font pack, scaled up, and insert it into the boot partition
- Tell GRUB to use that font
- Update GRUB
Generation of the font is done with grub-mkfont:
grub-mkfont --output=/boot/grub/fonts/readable-48point-dejavumono.pf2   \
            --size=48                                                   \
            /usr/share/fonts/truetype/dejavu/DejaVuSansMono.ttf
This generates the output file in the appropriate place -- /boot/grub/fonts/
You'll see some errors spewed out there, about unknown gsub font features and unsupported substitutions -- but these don't materially affect the outcome, and really, the grub menu is ever going to have a handful of entries on it, without any exotic characters.
Edit the file /etc/default/grub and add this line (or lines if you like to comment things, though I gather this file's comments are semi-regularly over-written during upgrades)
GRUB_FONT=/boot/grub/fonts/readable-48point-dejavumono.pfs
Run update-grub to implement these changes.
Reboot to confirm.
You should get something a bit more readable like this:
 GRUB with small fonts - after being fixed
In case you're curious (I certainly was), pf2 is yet another font format created for GRUB, with a good writeup at grub.gibbit.com.
Font design goals: bitmapped, compact, unicode-support.
Evidently no other format with these features existed at the time.
Hmmm.
LVM on top of a crypted partition
There's two ways you can do LVM with encryption (actually, more than two, but nonetheless).
Create your LVM, crypt each logical volume, then make a file system on each of those. This is a very abd way of doing it as you can't easily grow volumes, of course, which is one of the main reasons to run LVM in the first place.
Or, crypt the volume, then run turn the resultant crypted device into a single Physical Volume, and that's the way I've done it here.
Remember that these commands can destroy partitions in the blink of an eye, so be very, very careful with them, and don't just drop in my device names here, but instead take your time to work out your own partition layout.
Crypted volumes are created with:
cryptsetup luksFormat /dev/sda3
It'll ask for a passphrase, twice, to be sure. And then, it's made.
You can then open / attach the encrypted volume with this:
cryptsetup luksOpen /dev/sda3 sda3_crypt
The third parameter is up to you -- it becomes the device mapper name that the crypted volume will be known by.
I chose this format as it means I can find the drive again, but it doesn't necessarily scale to more than one or two hard disks. Look at the commands blkid and lsblk for future reference.
Anyway, my /dev/sda2 (crypted root file system) gets luksOpen'd with a name of sda2_crypt, so it's a simple alignment.
Once you've luksOpen'd the volume, you'll find these in your /dev/ structure:
shpongle:~# ls -l /dev/mapper/

  lrwxrwxrwx 1 root root       7 Feb  1 22:52 sda2_crypt -> ../dm-0
  lrwxrwxrwx 1 root root       7 Feb  1 22:52 sda3_crypt -> ../dm-1
And then you can work with /dev/mapper/sda3_crypt as you would any other drive, but secure in the knowledge that it's encrypted.
I use it as a Physical Volume for LVM2.
Now, there's plenty of good LVM2 tutorials out there, but this is what I did:
pvcreate /dev/mapper/sda3_crypt
vgcreate vg1-crypted /dev/mapper/sda3_crypt  # obviously pick your own Volume Group name
lvcreate -L 500G vg1-crypted -n garden       # again, obviously, pick your size and Logical Volume name
I have a directory that's shared with family members, and kept in sync amongst 4 or 5 computers, usually mounted (locally) to /home/garden, hovering around 450GB in size at the moment, so it's a common feature on my computers.
None of which is relevant to you, but it does demonstrate LVM on top of CryptSetup.
There's one last thing about making this a bit more seamless . . .
Single-password decryption of multiple encrypted partitions
You don't want to have to enter two crypt passwords during boot (or indeed, a second crypt password after boot).
The following mechanism is my hacky way of doing this, but it may not be Best Practice, so do some research before adopting it for your own purposes.
I rely upon the fact that the root file system ( / ) is encrypted, and that cryptsetup volumes can have more than one active key at a time, so I add a new key to the large volume (sda3 in this case), and then store that key in /etc/cryptkeys/sda3.key
This is acceptable risk to me, because I'm likely to use the same key on both root and subsequent file systems, and if the first is broken, then the second is too. I still retain a key to the subsequent volumes that I can type, if I need to for troubleshooting, but in general this approach has worked well for me for some time.
mkdir /etc/cryptkeys
chmod 700 /etc/cryptkeys
cd /etc/cryptkeys
dd if=/dev/urandom of=sda3_crypt.key bs=256 count=1
chmod 400 sda3_crypt.key
This generates a 256-byte long mostly random binary file.
We add this key to the list of keys that can unlock the volume:
luksAddKey /dev/sda3 /etc/cryptkeys/sda3_crypt.key
You're asked for any other existing password at this point.
We identify the UUID of our crypted volume (in my case, /dev/sda3)
shpongle:/etc# blkid
  . . .
  /dev/sda3: UUID="ab854076-3a48-d40c-d98b-b2b7f07862073" TYPE="crypto_LUKS" PARTUUID="00efb043-53"
Then we update /etc/crypttab so that this thing is mounted automatically
sda3_crypt UUID=ab854076-3a48-d40c-d98b-b2b7f07862073 /etc/cryptkeys/sda3_crypt.key luks
Job done.
Reboot to confirm that it works -- you should enter one password (immediately after the GRUB menu) and you should have two sda_x__crypt entries in your df output.
As an aside, note that my second and third partitions are both of type 83 Linux as it's not LVM per se, but rather a crypted volume. I believe it should probably be set to fd, which covers everything using the dm layer, not just RAID / mdadm. But ... I don't think it's a biggy, as the primary thing here is to discourage other operating systems from poking their nose into it.
Touchpad configuration
What's not immediately obvious is that you need the touchpad module for KDE to let you configure it (it's not immediately obvious as you'd expect the various 'laptop' packages would have pulled that one in).
So, pull in:
apt-get install kde-config-touchpad
You don't need to restart the computer after this, but you will need to close System Settings if it was already open, and then restart it. Once you do you'll find the Touchpad tab available under System Settings // Hardware // Input Devices. Within the Touchpad configuration, on the fourth tab called Tapping you can configure single tap (not press) to trigger left-mouse-button, which is the way of sanity.