ObDisclaimer: This may not be particularly slow-carb. It's certainly not as healthy as it sounds - given it sounds like a combination of chick peas and herbs.
You can mitigate this in a few ways - eat only a few of them (it works well if there's a larger crowd, or just pop some in the fridge for another meal). Also, cook at a higher temperature (they seem to soak up less oil that way). Use better oil (though obviously this helps only marginally).
But in theory this meal is kind of within the scope of a Slow Carb meal. In practice we'll have a couple of these along with some more conventionally healthy food - a salmon steak, spiced-up refried beans with onion, salad, etc.
However, these things are undeniably tasty.
Note that there's a near infinite variations on this recipe out there already - and I'd encourage you to take this (and maybe some others) and work out your own blend that you're happy with. They're a tremendously fun thing to experiment with, and it's really hard to make genuinely bad falafels. I did it once, but it took some significant effort - and no, I didn't get away with it. It turned into a fairly disgusting and definitely inedible olive oil and chickpea soup.
Ingredients
As I say, experiment with this stuff. The following will give you a mighty fine result, taste-wise – and while I think it's close to perfection, it'd be hubris to believe that I'd reached perfection.
From a health perspective, chickpeas aren't as ideal as other legumes, so perhaps try substituting some ratio of chickpeas with some other pulses, for example. Also you can really bump up the herb component. As others have pointed out, falafels should look green on the inside.
- 200gm dried chickpeas – was 2.5 cups soaked overnight (but not cooked – DO NOT use tinned chick peas)
- 3 small red onions
- 4 teaspoons crushed garlic
- 1 teaspoon dried coriander (would prefer fresh)
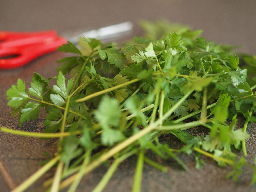
- bunch of fresh parsley (need more probably)
- this time - a qty of garlic chives - just something to get greeny garlicky goodness into the mix
- 2 teaspoons baking powder
- 3 tablespoons gram flour (also known as besan flour, garbanzo flour or simply chickpea flour)
- Spices - salt (hold back, but definitely needs some), black pepper, cumin if you want
- 1 egg
And enough oil to shallow-fry, say 1cm depth – I used some combination of peanut, grapeseed and macadamia. Usually a splash of sesame oil too – though I'm not sure how much of the flavour comes through in the food, the smell while cooking is just delightful. Depends heavily on the size of your pan - I'd guess I use about 200ml in a 16cm small but deep-walled cast-iron frypan, but I try to recover as much of that oil as possible, store in the fridge and try to re-use within a week or two.
Most recipes I've seen suggest using normal wheat flour, which I've replaced with gram flour (as above) - this is a binding agent, and I've tried to reduce the quantity by adding an egg to the mix. You can reduce it further by replacing it with a second egg, but I find the mixture is then bordering on being too runny. It's still workable, but you really need to play with the ratios a bit - just be aware.
If you find you've experimented and got a mix that's a touch too runny, try adding another egg, or a bit more flour, or both - then run it through the blender again. In practice I've had some pretty sloppy mixes in the past, and these changes have been enough to recover the meal. Also make the oil a bit hotter (macadamia oil won't start to smoke until about 230° C, so you've got some room to move), which will obviously cook the falafel faster, with less time for it to start dissolving.
Method
At least 12 hours prior, and ideally the night before, pop your dry chickpeas in plenty of water to soak. Change the water at least every 12 hours, especially if it's warm. Make sure they all stay covered by the water.
At least two hours before you want to cook - prepare the mix by blending the bejesus out of all the ingredients (except the oil).
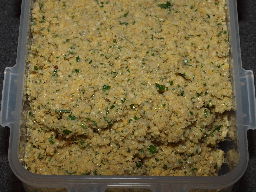
See the picture below for an idea of what the resultant mix should look like. It should look a bit like crunchy toothpaste, with the same consistency and viscosity. It'll firm up a bit more in the fridge. Adjust blending time to taste, of course - if you want coarser bits of chickpea for the 'bite', knock yourself out. This process usually takes me about 5 minutes, including lifting the lid on the blender and knocking the chunky bits back down into the bowl.
You absolutely positively must blend this up and pop it in the fridge for a couple of hours (longer, if possible). Do not skimp on this step. Seriously. (If you're wondering why, and well you should, the rationale is this – flavour is improved, so they say, but the big thing is the consistency – the mix just becomes so much easier to handle and shape once it's spent a few hours in the fridge – perhaps the besan soaks up the residual liquid.)
When you're ready to cook, heat up the oil in a pan on the stove.
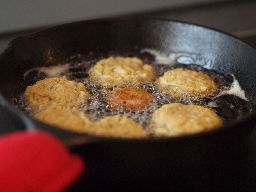
I still don't have an oil thermometer, but on my 'up to 9' induction stove-top, and using a very solid cast iron pan, I can cook nicely at a setting of 5 or 6 - I'd guess this is around 180C, but that's highly speculative.
By 'cook nicely' I'm referring to the contention between trying to not keep the falafels sitting and soaking up oil for more than a minute or two, but also not burning them before the insides are properly cooked. There's also the work flow of getting several going in a row - a production line so to speak. This sounds wanky, but in reality it's ideal, as if you put them all in in one go, you'll find the oil cools down way too much, and takes a long time to recover to the ideal temperature. They also start to all burn at the same time, which can induce mild panic. And smoke alarms. A larger pan would help, but it's a lot more oil, and also much harder to keep the process running smoothly. A solid cast iron pan really does help, though, as it holds its heat much better - hence the regular mention of same.
Up to you how large to make them. I aim for roughly twice the thickness of the oil level I'll be frying in, and about 4-5cm across. I shape them using a flat dinner plate, two desert spoons and my fingers, and lower/slide them in using the spoons.
I flip them once using two forks, and also extract them with two forks, trying to encourage as much oil as possible to drip off them. Be wary of metal utensils in boiling oil, of course.
Pop them on some kitchen paper to soak up a bit more of the oil.
As mentioned above, it's best to serve these as incidental to another meal, simply because they can be quite dense - in both energy and texture. They do keep in the fridge for a couple of days, and don't need to be re-heated to be tasty.
For serving, conventional wisdom suggests some tahini, but for my own part I find them plenty tasty without condiments.


