I've been rediscovering VMware's $-free product ESXi. I would much rather be using kvm and managing it with virt-manager -- but I'm working with a bunch of virtual appliances that are only certified to work on ESXi.
Because I've just built a new low-powered Intel i5 based ESXi whitebox, I'm going to move all my server functionality into it, and maybe some of my rackspace instances too -- they tend to have low-network and low-CPU demands, so it's a good fit. But almost all of these are going to be Debian GNU/Linux 64-bit instances.
While I'll be using SaltStack to maintain them, my provisioning is still a wee bit old-fashioned. Until salt-virt starts to support something other than kvm, it's likely to remain that way, as I just don't crank up that many boxes to need to automate this bit of the provisioning. I'm happy to spend a few minutes doing this process, and then let Salt do the rest.
Anyway, what I usually do is build a very basic instance, call it basebasebase so that I can find-and-replace instances of that name later, and get just enough on there so that it can talk to my Salt Master.
This works great with virt-manager as it makes it easy to clone guests. With ESXi however, VMware is encouraging you to move to kvm by declining to put this quite basic feature in their $-free VI Client software.
The point is that while it's a bit of a manual process to recreate this basic functionality, and it has some residual ugliness in terms of nomenclature, it is quite easy to do this.
The process
I may get some pictures into here one day, but really it's not hugely complicated.
Merely doubleplusunintuitive.
Overview
Below I'll clone an ESXi virtual machine called base-debian, and call the new copy newbox.
I'm using ESXi version 5.5, with SSH enabled (not essential for the functionality).
My ESXi server is called daft. All my hosts are named after bands and musicians that I like -- this host is the first of a pair of tightly coupled machines.
Copy the vmdk and vmx file(s)
Make sure your source VM is not running. (You can do this while it's running, but it'll be broken, so just don't.)
You can copy the files through the inconvenient-to-launch Datastore Browser, ideally using two different Datastore Browser windows - and copy the *vmdk and *vmx file(s).
With the Datastore Browser, create a peer directory, call it something sensible (I'll use newbox), and copy these files into it.
I prefer to do this via SSH -- it's a bit faster, and obviously can be scripted. I've set up passwordless ssh login on my ESXi server -- details at the end of this page.
If you choose to do this via SSH, you'd do something like this:
royksopp:~$ ssh daft
The time and date of this login have been sent to the system logs.

VMware offers supported, powerful system administration tools.  Please
see www.vmware.com/go/sysadmintools for details.

The ESXi Shell can be disabled by an administrative user. See the
vSphere Security documentation for more information.

~ # cd /vmfs/volumes/phat/

/vmfs/volumes/5297e192-bc9a7211-9392-6805ca1e47b4 # ls -l
total 256
drwxr-xr-x    1 root     root          2100 Dec  2 17:37 base-debian

/vmfs/volumes/5297e192-bc9a7211-9392-6805ca1e47b4 # mkdir newbox

/vmfs/volumes/5297e192-bc9a7211-9392-6805ca1e47b4 # cd newbox

/vmfs/volumes/5297e192-bc9a7211-9392-6805ca1e47b4/newbox # vmkfstools -i ../base-debian/base-debian.vmdk -d thin newbox.vmdk

/vmfs/volumes/5297e192-bc9a7211-9392-6805ca1e47b4/newbox # cp ../base-debian/base-debian.vmx  newbox.vmx

/vmfs/volumes/5297e192-bc9a7211-9392-6805ca1e47b4/newbox # vi  newbox.vmx
The -i means input. The -d refers to the disk type - you may prefer to not use thin but for my purposes it makes the most sense. This process copies the normal vmdk file as well as the -flat.vmdk file across, as a single operation.
When I edit newbox.vmx I am just changing the four occurrences of base-debian to newbox (or whatever the new host name is). These are nvram, displayName, extendedConfigFile, and scsi0:0.fileName.
There's one line I don't bother changing -- sched.swap.derivedName -- I just delete that line instead (it's recreated automatically).
You can check that you've got a thin-provisioned vmdk by using the Datastore Browser - it'll have an extra column showing actual versus logical size of the files in that directory. If you don't get that extra column, then nothing in that directory is thinly provisioned. Not the most intuitive of things, regrettably
Import the cloned disk images into a new VM
Going back to the Datastore Browser, navigate into your newbox directory, right-click on the vmx file, and select Add to Inventory.
You'll be asked three questions.
First, to name the new machine. This is easy, and I usually (but not always) find that it's picked up my new host name.
Second, what resource pool this guest will be in. Also easy.
Finally, to press the Finish button, which is perhaps the easiest of the lot.
You can now launch the new VM from your Inventory list.
This will generate the fourth of the three questions you have to deal with. And it won't do it in a terribly obvious way (you need to have the particular host highlighted in the viClient).
You'll see the Tasks list show that it gets a third of the way through powering it on, and then stall. If you navigate to the Summary tab of the newbox, you'll see there's a question waiting for you.
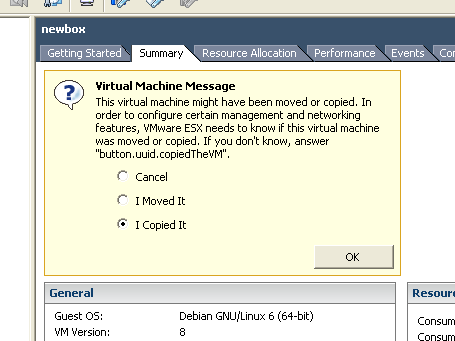 Select the not-a-bug button.uuid.copiedTheVM radio button.
( Jokes aside, click the I Copied It button. )
ESXi had already done its internal dance to generate the other crufty vmxf, nvram, etc files - this just sanitises the configuration.
At this point your new machine is ready to go.
Closing notes on guest image nomenclature
One thing that offends my sense of tidiness (you say OCD, I say tomato) are the filenames for new virtual machines. You can use the above vmkfstools command and keep the same filename for the vmdk file, and then just copy the .vmx file across - this will work okay, as the machine will be registered as a new, copied, VM, based on the directory name that it now lives in.
This approach means you don't need to edit the vmx file at all.
But I find that really really really untidy, as I say.
Bonus -- password-less ssh login to ESXi
This is not rocket surgery, but worth mentioning in case you are having Fun getting it to work.
Once you've enabled SSH access on ESXi you connect over the wire as root, and you discover root's home directory is / ... which probably makes Solaris refugees comfortable, but is a bit annoying for anyone used to sensible operating systems. You can't, though, create a /.ssh/authorized_keys file and hope it'll work, because you'll notice in /etc/ssh/sshd_config they've set:
AuthorizedKeysFile /etc/ssh/keys-%u/authorized_keys
Add your public key (the contents of your ~/.ssh/id_dsa.pub, say ) to {ESXi host}:/etc/ssh/keys-root/authorized_keys
And then change the PermitRootLogin to something more secure than yes, specifically:
PermitRootLogin without-password
Note that you don't need to restart sshd -- it picks up changes immediately. So be very sure to test your connectivity in another terminal before logging out of the current one.
On your client, add a ~/.ssh/config stanza for your ESXi host to automatically connect as user root:
Host daft
User root
Port 22
Job done.